Posts

Showing posts from 2017

Video Final Reflection

Image
This Semester In Video This semester we learned about Convergence Journalism. Within convergence journalism we learned how to compose a news story, feature story, and how to write a news story. We were taught how to create a thorough interview with twenty one interview questions. We learned a lot about how the camera itself works and hoe to recored, put in batteries, adjust white balance, and much more regarding the cameras. We learned how to set up the tripod by extending the legs and hoe to slide the plate on and off (which my group struggled with for a really long time). We also had to apply the six shot system and the rule of thirds to make our videos more visually appealing and interesting.During all of our projects we  had to use our five skills. I used leadership in order make sure everyone got everything done, we all used our technical skills to work the camera and edit the videos me and my team created. We used time management to get everything done, and we use communic...

Final Reflection

Image
My Story Animation Project In this project I learned how to compose a story and apply all of the skills I have learned over the course of the semester. I learned all of the skills in the video that were taught to me by Mr.Olson, and I got a lot of help from my friends. I picked this project because I put a lot of time into it. I spent many power 50's and many hours after school to create it. I also think its one of my most appealing project that I have done. I think my greatest strength is creativity, I used had to think really hard about this though because I was struggling to come up with an idea. I think my weakness is the puppet pin tool because it took me so many tries to get it right. I understand it more thoroughly than I did before and I know how to set key frames with the puppet pin tool now. If I could change something then I would change the part where transports from area to another really fast. Overall I liked this project and it was really fun to do. Wal...

My New Animation

Image
Pre-Production The First thing I had to do when it came to making my animation was coming up with a story and drawing the idea on a storyboard. I used the storyboard to visually see what I had to put into my animation to make sense. I think he hardest part about that process was figuring out what my plot was going to be. I had not very many ideas but after thinking for a very long time I decided that I would animate a story about a ghost that cannot walk through walls. Production The production was the most difficult part after all. I animated each scene individually and I out it onto Adobe Premier in order to put all of my clips together. I decided to first draw all of my scenes and characters in photoshop which took about two days. Then I out the photoshop files into After effect. Animating all of the things took the rest of the time. I found it very difficult to work with the puppet pin tool when I was editing the part where the ghosts hit the wall. Other than that it wen...

My Written News Story

Young Author Publishes their Third Book Before the Start of Sophomore Year Olathe Northwest sophomore Lylena Estabine published her third book ever this past July. LyLena has been writing since fifth grade. In fifth grade she was a part of a special program that pushed students to read and write LyLena said,“ I believe that's where I got my start in writing.” LyLena first book was called Lose Cursed Secrets of the School. After that LyLena has published On the Bridge and A Special Kind of Magic. LyLenas most recent book is a dystopian novel about a boy named Colt and the struggles he faces in his world. LyLena said she got her inspiration for the book from hr everyday life“ I was really inspired by the two sides of the american conflict and turmoil,”,Estabine said. LyLena published this book by herself which means she has to do all of the marketing for it and all of the selling on her own. LyLena is currently working on her new book, but she does not necessarily want to...

Feature Story Number 2

Image
Pre Production The first thing did as a group was decide who we wanted to interview. We decided to interview LyLena Estabine since she is our age and has already written three different books. After we figured that out we thought we would interview her freshman English teacher as well to add to the story. We created one storyboard which planned out where we were going to shoot. Then we came up with our twenty-one interview questions which were fairly easy to come up with since she has done a lot in life. We also planned out which days we were going to film and edit. Production I was the director and was in charge of the camera. It was really difficult to film because we did not have audio for awhile and we could not figure out how to get audio. So he had to enlist the help of Mr.Cooper and we just did not have the mic plugged into the right place. So we were a day behind because it took us an entire class period to figure out our technical issues. When we filmed the whole th...

Multiplane Animation

Image
Creating My Animation The first thing we did when creating this animation was create a very long template in photoshop. Then we divided it into four sections. Each section was a different layer and each layer had to be different than the others. This was really difficult for me. The trees were very hard to make and they took a lot of time to copy and paste then and then merge then all onto one layer. I didn't like how the trees turned out. Animating the plane Before we animated we watched videos on how multi plane animation works. We watched videos on how they used to do it back in the day. I think it was really cool but it also took really long. Anyways after I created the base in photoshop I began to animate it in After effects. I did not really learn anything new. But it was really easy to animate. Overall  I think this was not my best project. I do not like the color scheme I think its too dark and gloomy. I also do not like the style. I also messed up the anim...

Walk Cycle Animation

Image
Sketching The very first thing I did was sketch my character. I decided to sketch a bear and it took many tries to get it right. It took about a day to do that. After I had sketched my rough outline I had to trace over it with marker. I decided to trace over it with a blue marker since he is a polar bear and it just kinda went with his character. After I traced it I rubbed the marker and smeared the outline of me bear and it made editing it more difficult in the future. After I was done with that I took a picture of it and put it in photoshop. Photoshop Once my photo was in photoshop I had to edit it. I turned up the exposure and made it so the background was completely white. I had to mask the edges so all that was left was the bear itself. Once all I had was the bear I had to separate the body pieces. I did that by making new layers for each body piece and then selecting and deleting them from the original copy. I separated every single thing including the head. I als...

ONW 1 in 2000 Interview

Image
Pre-Producion Our concept was to interview Noelle Chism about to her trip to South Dakota. We all compared stories of what we did this summer and hers was the most interesting and exciting so we choose to interview her. The very first thing we did was assign roles, I was the interviewer so I asked the questions. On the first day we started our rough draft of our story board. On our rough draft we didn't have many different angles but that was okay since it was an interview. We also came up with twenty one interview questions to make Noelle. It was really hard to come up with these questions because we did not really know what she had done in South Dakota yet, since we had not interviewed her. Despite that we created the twenty one interview questions. After that we got everything okayed and we were ready to film. Production During the production I had to make up a lot of questions on the fly. That way I could get good through answers from Noelle. I  learned that if I am...

Inchworm

Image
Overview This week we created an inchworm on After Effects. First we created the worm and its layers in photoshop. Then we moved the photoshop version into after effects. We then proceeded to put pins in the worm so that we could move specific parts of the worm. We created two key frames where the inchworm is at rest and one where he has his middle up and his back pinched in. After that we attacked the worm to a null object thats called parenting. Once we did that we created positions for the worm to be in. Once we had the worm moving cross the screen correctly I created a shadow my creating a duplicate of my worm. Then I turned the worm completely black and turned up the opacity. Then it was finished. What I Learned I learned many things for this project. The number one thing that I learned is that when Mr.Olson puts out a video you have to watch the whole thing. I did not watch the whole thing so my video looks kind of weird. I also learned about the puppet pin tool and ho...

Bouncing

Image
Overview The project we did was a 3D bouncing ball animation. We used Adobe Photoshop and Adobe After effects to complete this project. First we created all of the layers that we were going to animate in the future. Then we put all of the layers into Adobe After Effects and that's when we started to animate. We created motion keyframes which between each key frame there was a motion path. So we could see the path the ball was going to travel. Then after we did that we curved each of our motion paths so it looked like it was bouncing and not zigzagging through the air. Then we squashed and stretched and rotated our ball in the air. That part was the hardest for me because it was difficult to get it right. What did I learn? I learned a lot about animation with this project. I learned that if you make a mistake your project won't look quite right until you fix that mistake. Everything you do in animation also has to be timed just right. Such as when you bounce the ball ...

ONW Procedures Video

Image
Coming Up With Our Procedure The very first thing we had to do when new stated this project was figure out which ONW procedure we should do. We didn't want to something boring, because we did not want to make our audience bored. So we decided to make a video about not standing in the go zones. As soon as we got that idea we realized every other group in the room also had that idea so we had to come up with something else. After about ten minutes of bouncing ideas back and forth we decided to make about now abusing your planner. We decided to make the boring procedure more fun by making the video itself funny. Pre-Shooting Before we could shoot our video we had to do a few things. First thing we did was we came up with a story board. The story board helped us figure out our setting and it helped us figure out what we were doing. We had a lot of ides, so many ideas we couldn't fit all of them onto the storyboard. We had to create a much shorter version of what we origin...

Final Blog

Image
Our Final Project in e-Comm Our final project this year was a group project. We had to come up with a product, and make up graphics and a website to go along with it. Then once we had done that we had to present our product and the website to other students in second hour e-Comm in a shark tank fashion. This project took an entire quarter. It took so long because we had around one week to do certain parts of the project. We spent the most amount of time working on our graphics for our company and our website. While working on the graphics we ran into some problems. Our team disagreed on the way the website graphics should look, we had to make many comprimises. Along the way I learned that you really need to listen to other peoples ideas, others ideas can really help make the content stronger an more visually appealing. My team got really good feedback, everyone said it was put together very well and it was really interesting. We had to change many things on our website and that is w...

Fourth Quarter Presentations

Image
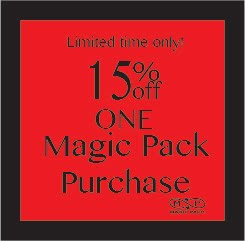
Where have I been? Hello! For the past few weeks I have been working on a project for e-Communications. I have been working with a group of four people to create a product that can be useful to the public. Our tea name was Company Incorporated and our product was the magic pack. We created some coupons and graphics and this will be at the bottom of this blog. How well did our Team work together? Our team worked together really well. We got things done on time and sometimes even a little bit early. The team was really good at deciding on things and making sure everything was fair. Everyone did their part. If one person needed help then they could ask for help and receive it almost immediately. We all were very good a solving problems. For example we had a small dispute over the 2D animation and it was resolved really quickly, because he had a good system for soling problems. Majority rules. It worked every time plus we had an odd number so we never ran into any problems regardi...

My Team

Image
This Week in E-comm This week we began to learn more about our new E-comm teams. I am one out of two Otters on my new team. Within our team there is not a designated leader we all contrubute equally. There is an equal balance of power and everyone gets included. Within our team we all work really well together. I constantly made sure that everyone was included in our discussions, and that all ideas were heard. Or team name was Company Inc. We named it that because we wanted something really simple and basic, but also unique. So we decided to take two different titles and combine them into one. If that makes any sense at all.Our project was the Magic pack. The pack is magic because you can fit anything you want in there. Big or small it basically goes on forever. Our target audience is 18-33. We chose that range because it is the range that travels the most so it would be most convenient for that age group. We used all of the five E-comm guarantees. We used our technical skills t...

Creating the Website

Image
This week we created a website on dreamweaver. Before we created the website we had to learn about CARP. CARP stands for contrast, alignment, repetition, and proximity. You have to use this system when creating anything in design. If you want to have a good design you must use CARP. We learned about CARP for one full hour. That was we understood what it meant and could apply it to our website. Creating the website was very difficult because I did almost everything wrong. First off I started my website in the wrong dream weaver. When I asked my friends for help it took me an entire hour to figure out I was trying to create in dreamweaver 2017 and not dreamweaver 2015. That was very upsetting. But once we realized that I was in the wrong dreamweaver we switched. After that everything was going smoothly. Until I made another mistake. I entered the wrong information into dreamweaver. So I had to do it all over again. I did not like this project. It was really difficult for me and it...

Personal Logo

Image
Hi! This week I created a personal logo. I found it very difficult to create this logo. It was difficult because it took me a long time to think of a logo. I had help from some of my peers and they helped me tap into my creative side in order to create a logo. After the help from my peers I had to decide which one I was going to use. It was not an easy design, but I went with my gut and went for the logo with the umbrella. I used my favorite color red in my logo because it makes me very happy. I wanted the logo to symbolize me so I used my favorite color. Re-creating this logo in illustrator was fairly easy. I quickly got done with it due to the fact that it is very simple. Some parts of my logo I don't like very much but I think others would like i. I had a tough time creating the letters. I had to re do it three times. I think I did really good on this assignment. I am very proud of my work.

Flower

Image
Hi! This week I sketch a flower twenty different times and then put it on illustrator. It was really difficult to sketch twenty different flowers. I didn't even know there were twenty different types of flowers! It took a long time to finish sketching since I really had to tap into my creative side. Each flower is completely unique and that was very difficult to do. I did not know which one to re-create so I had to ask my friends and they chose flower five. Re creating the flower drawing on illustrator was very frustrating. It took me a long time to do because nothing would connect to each other. After asking for help from my peers I finally got it. I am not happy with the final product though. There are a lot blank spaces and it just docent look quite right. I used a pastel colors. Since I pictured the flower in a light and sunny area. I do not like this picture. I don't think it is very pleasing to the eye and I feel as if I could do better than what I put out. Its not li...

My Personality Type

Image
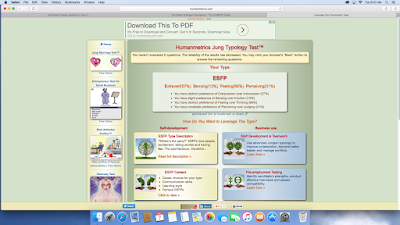
Who am I? This week I took a personally quiz. The sixty-four question test revealed that my personality type was ESFP. The E stands for extrovert the s stands for sensing the F stands for feeling and the P stands for perceive. I am energized but being with other people. I do better when I see a thing in front of me instead of imagining. I make decisions based of feelings rather than thinking it through. I perceive things and I don't judge them. There are many famous actors that have the same personality as me such as Justin Bieber and Beyonce  Is this Really Me? I think that this personality is pretty accurate. I do make all my designs based on feeling and I think that part is spot on. Also there are facts about the ESFP group and one of the acts is most likely to have a low bank account. I sadly suffer from this because I only have ten dollars in my bank account currently. The only thing I disagree on is the fact that I have less creative Ideas than Intuitive people. I ...

Colors!

Image
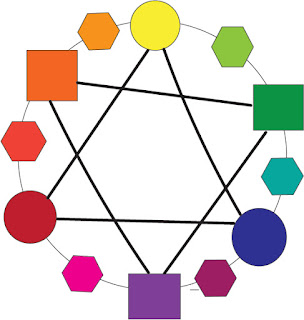
Me with Colors My favorite color is red. I associate red with a memory of my volleyball team winning a tournament. I associate red with this memory because my team had red jerseys. I had not always liked the color red. I used to prefer a pale blue, but after I had won the volleyball tournament red was my favorite color. So when I see red I think of passion, drive, and happiness. I wish I could change my bedroom walls to red, but my mom won't let me. There are so many food products out in the world that are red such as  Apples, McDonalds fry holders,tomatoes,ketchup, and so many more! Red is everywhere because it is bright and really stands out, but red can also be a shadow or a tint and still look amazing. My least favorite color is yellow. I don't have any bad memories to associate with yellow. When I think of yellow I just think of disease and broken bones and its not fun. This color is everywhere due to the fact that it is a primary color but I wish it was not. I do...

Creating a sketch on illustrator

Image
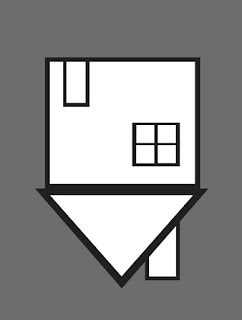
Hello! This week I drew a sketch then created it on illustrator. That is what I will be talking about today. So first I had to figure out what I wanted to sketch. I wanted to draw something simple ad basic,but I did not want to do something that everyone else was doing. If that makes any sense. I decided to make a house,but its not an average house its upside down. I decided to draw a house because its simple and its something I see everyday. I decided to make it upside down to represent how my life can be kind of upside down at times. After sketching I moved onto illustrator. We learned how to use the shaper tool. Which is a very interesting tool that allows you to create and destroy shapes. I used the shaper tool to create the top of my house. Since there is no triangle tool that I can use. This entire process was fairly easy for me. I decided not to add color to my design so I got done with this pretty fast. The most difficult part of this task was trying to figure out how to mo...

Sketching my first design

Image
My first design Hi! This week I sketched my first design in graphic design. It was very fun and I learned a lot about graphic design that I didn't know before. One thing I learned was that there are seven different key elements of graph design. These elements are line, color, texture, size, space, shape, and value. These are important because they help deliver the message that your trying to send out to the world. Without them your design would not be visually appealing to the eye, but if you use them then your drawing will be very appealing.  Sketching the design After learning about these elements I went straight to sketching. At first I did not know what I wanted to draw. After thinking awhile an idea hit me. I would sketch a picture of the big dipper but instead of stars it would be the logos of my favorite things. I mainly used logos because all the things I love had logs and they are fun to draw. I used a little bit of typography because I didn't want the ...